
A step towards decentralization, let’s take control thanks to OIDC!
Published on 21 September 2023
Cet article est également disponible en français : /blog/un-pas-vers-la-decentralisation-reprenons-le-controle-grace-a-oidc
Thanks to Linked Data, we need to think of our applications differently, most of all in a more secure way! It’s not the time anymore to connect independently to each application, where we have a different password per website, where our user data is sent in an insecure way. We need a fully secured authentication… and decentralized! To do this, we need to address the following issues:
- single authentication: improve the user experience, users should only have to authenticate once for all applications of the system (Single Sign On);
- strong authentication: precisely identify who you are dealing with, beyond a simple username, for applications requiring enhanced security;
- configurable authentication: each client must be configured separately, in order to define a unique level of security and permission, and a suitable authentication method.
There is a protocol that manages most of these needs: OAuth (Open Authorization). But it is not enough in our case, we need to complete it using OIDC (OpenID Connect).
What are these protocols? What are their differences?
Disclaimer
Securing your application behind an authentication system is good. Choosing the right one is much better! Before you challenge OpenID Connect, ask yourself: “Do I really need it?”.
If your system only contains a single service, the answer is probably no. The authentication currently implemented in your single service will respond to the issues mentioned above: unique, strong and configurable.
However, if your system contains several services (for example a PWA and an API), then the answer is probably yes.
Remember: there is no point in implementing a complex system on a simple application. It would be like using an anvil to hammer a nail: it’s heavy and unadapted.
At the origins of OpenID Connect
In May 2005, Brad Fitzpatrick created the OpenID Authentication protocol (initially named Yadis: Yet Another Distributed Identity System). This protocol quickly gained momentum, thanks to contributions from ZDNet, Symantec, Microsoft, AOL and Sun Microsystems. In May 2007, the OpenID Foundation was created with all these organizations, quickly joined by Yahoo!, Google, IBM, VeriSign and SourceForge, Inc.
On its side, OAuth 1.0 (RFC5849) was published in April 2010, and focuses on authorization. OAuth 2.0 (RFC6749) was released two years later in October 2012.
Finally, the OpenID Foundation published OIDC 1.0 in February 2014, an identification protocol that completes OAuth 2.0. Then? OAuth 2.0 has evolved through multiple RFCs (including RFC8252 OAuth 2.0 for Native Apps, and RFC7636 Proof Key for Code Exchange). Since July 2020, OAuth 2.1 is in progress in order to simplify OAuth 2.0.

“Identification”, “authentication”, “authorization”… These words appear often but are unfortunately often confused. However, they have a very important distinction in the subject we are discussing today. Let’s clear things up before we go any further!
Identification vs Authentication vs Authorization
Identification answers the question “Who are you?”. It consists of providing an information declaring an identity. This identity can be defined as the sum of all the characteristics that make this person who they are: their name, their date of birth, their place of residence, their identity card number, etc. These characteristics are called identity attributes. Some of them may be common (several people may have the same date of birth or place of residence), but the sum of these attributes is unique and constitutes the identity of a single person or application.
However, if my answer is “I am Vincent CHALAMON”, there is no proof that this is true. Providing a unique identifier is not enough, you must be able to prove your identity. Authentication occurs after identification, and verifies this declaration (using a password, for example) by answering the question: “Are you really Vincent CHALAMON?”. It’s a simple authentication. If I had to specify any additional authentication element (for example, a temporary code received on my phone), it would be a multi-factor authentication.
Authorization comes at the last stage of this security process; it consists of controlling the permission of an identified and authenticated person or application. Now that I have proven who I am, the authorization stage answers the question: “As Vincent CHALAMON, do you have the permission to perform this action?”.
Authentication without identification makes no sense. There would be no point in checking the authorization. The user must first introduce themselves. Likewise, it would be dangerous to have identification without authentication. On the other hand, it is possible to have authorization without identification or authentication. For example, an API publicly accessible allows anyone to read the information without identifying or authenticating you.
How do OAuth and OIDC integrate these notions into their protocols?
OAuth vs OIDC
OAuth
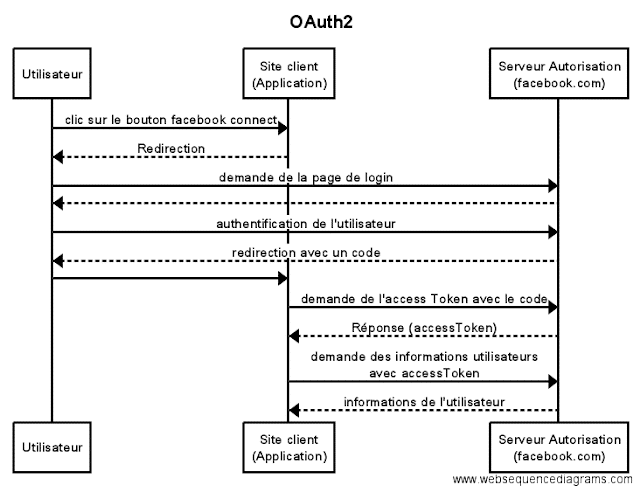
OAuth is a free protocol that allows a website, software or application (called a “consumer”) to be authorized to use the secured API of another website (called a “provider”) on behalf of a user. OAuth is not an identification protocol, but an authorization delegation protocol.
OAuth allows users to give the consumer website or software access to their personal information that it has stored on the service or data provider website, while protecting the users’ pseudonym and password.
(source: https://en.wikipedia.org/wiki/OAuth)
(source: https://www.ilex-international.com/fr/federation-identite/oauth2-vs-openid-connect)
OpenID Connect (OIDC)
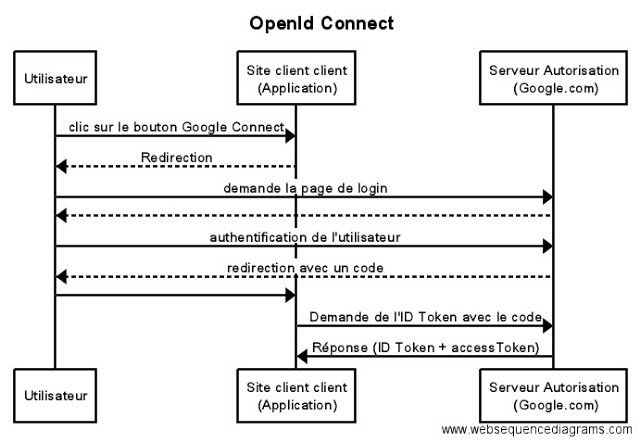
OIDC is an overlay to the OAuth protocol adding support for user identification. A first contribution of the OIDC protocol to the OAuth protocol consists of the standardization of data obtained following authentication. Unlike OAuth, which must send an additional request to the authorization server to get the user data, OIDC allows them to be included directly in the ID Token thanks to JWT.
(source: https://www.ilex-international.com/fr/federation-identite/oauth2-vs-openid-connect)
OIDC also brings some new features in terms of security, such as the use of the JWT specification, and strong authentication.
OIDC does not replace OAuth but complements it. The features of the OAuth protocol are still present, but improved thanks to reinforced security and decentralization of user data.
Here, you should understand that the word decentralized means that you have a single provider of your private information: the authorization server. You have control on that information, which one is there and who can access it. And you make them available to several services. A service does not have your data directly and you must be able to revoke its authorization. It is why OpenID Connect is decentralized: the service you wish to use has not centralized 100% of the information necessary to work, it must get them from the authorization server of your choice. The SOLID project is trying to complete this need, but that will be the subject of another article.
OIDC introduced several important concepts, including JWT and strong authentication. This is real value for secured and decentralized authentication (Single Sign On).
JWT
OIDC follows the JWT (JSON Web Token) specification, which consists of storing user data in a signed JSON document, optionally encrypted, then encoded in base64 to be shared between applications. Then, this token allows the user to be securely authenticated with the provider, while respecting the “stateless” REST constraint.
Note: although OIDC follows this specification, this is not necessarily the case for OAuth. However, its use is recommended thanks to the JOSE specification (JavaScript Object Signing and Encryption).
The JOSE specification allows this JSON document to be signed (JWS: JSON Web Signature) and/or encrypted (JWE: JSON Web Encryption). The signature guarantees the authenticity of the JSON document, encryption makes its content confidential.
(example of unencrypted JWT, base64 encoded, with a signature verified with the secret “secret”)
If you look closely, this token is made up of three parts separated by a dot:
- the header which contains the details of the signature algorithm (for example: {“alg”: “ES256”, “type”: “JWT”})
- the payload (also called claims), which contains user data, encrypted or not
- the signature which ensures the authenticity of this token (header + payload + secret signed together according to the algorithm defined in the header)
Once decoded, the JWT payload takes the following form:
{
  "iss": "https://server.example.com",
  "sub": "248289761001",
  "aud": "s6BhdRkqt3",
  "nonce": "n-0S6_WzA2Mj",
  "exp": 1311281970,
  "iat": 1311280970,
  "name": "John DOE",
  "given_name": "John",
  "family_name": "DOE",
  "gender": "male",
  "birthdate": "1980-10-31",
  "email": "john.doe@example.com",
  "picture": "https://example.com/john.doe/me.jpg"
}
Encoding the JSON document in base64 makes it easier to share but does not guarantee its integrity. It is therefore possible to easily decode it, modify its content and sign it again while respecting the same algorithm specified in the header. This is why a secret is used when signing it, of which only the authorization server is aware (and possibly the provider). It will also be recommended to use asymmetric algorithms such as RS256.
Multi-factor authentication
We saw previously that identification answers the question “Who are you?” and that the authentication verifies this declaration.
Concretely, if I answer “I am Vincent CHALAMON” and prove it using my identity card, my identity cannot be 100% certified because this identity card may be false: it is a simple authentication based on a single authentication factor. To prove my identity, I must provide several authentication factors in order to constitute multi-factor authentication, using at least two distinct factors:
- an ownership factor: identity cards, smartphone, etc.
- an inherent factor: fingerprints, face, etc.
- a knowledge factor: PIN code, passwords, etc.
Certainly, these factors can be usurped, stolen or reproduced. However, this increases the complexity of an attacker’s task during identity theft.
Note: in 2021, the ANSSI distinguishes between strong authentication and multi-factor authentication: strong authentication, in this definition, is based on cryptographic mechanisms deemed strong but not necessarily on several authentication factors.
After the theory, practice ! Now let’s see how to set up an OIDC server and use it in an API Platform project.
Set up an OIDC server
At first glance, we would be tempted to implement an OAuth Server bundle in our API Platform project. However, these bundles do not always support the OIDC protocol. Furthermore, in order to implement an architecture that respects the state of the art, it is appropriate to dissociate the provider from the authorization server: the latter must be an entity in its own right in our architecture.
There are SAAS solutions, for example Auth0. But in this article we will rather focus on Keycloak for its Open Source aspect and because it is a reference on the market.
An OIDC server with Docker Compose
Installing Keycloak is very easy thanks to Docker Compose. We need a Keycloak container and another for its database:
# docker-compose.yml
version: "3.8"

services:
  keycloak-database:
    image: postgres:15-alpine
    volumes:
      - keycloak_db_data:/var/lib/postgresql/data:rw
    environment:
      POSTGRES_DB: keycloak
      POSTGRES_PASSWORD: '!ChangeMe!'
      POSTGRES_USER: keycloak

  keycloak:
    image: bitnami/keycloak:21-debian-11
    environment:
      KEYCLOAK_DATABASE_HOST: keycloak-database
      KEYCLOAK_DATABASE_NAME: keycloak
      KEYCLOAK_DATABASE_USER: keycloak
      KEYCLOAK_DATABASE_PASSWORD: !ChangeMe!
      KEYCLOAK_ADMIN_USER: admin
      KEYCLOAK_ADMIN_PASSWORD: !ChangeMe!
    depends_on:
      - keycloak-database
    ports:
      - target: 8080
        published: 8080
        protocol: tcp

volumes:
  keycloak_db_data:
Start the Docker Compose project: docker compose up -d. Keycloak is available at https://les-tilleuls.coop.
But for the needs of an API Platform project, we want to run Keycloak behind our Caddy reverse-proxy. To do this, add a rule to the Caddyfile, and adapt the Docker Compose configuration a little:
# api/docker/caddy/Caddyfile
# ...

# Matches requests for OIDC routes
@oidc expression path('/oidc/*')

route {
    # ...
    reverse_proxy @oidc http://{$OIDC_UPSTREAM}
}
# docker-compose.yml
version: "3.8"
services:
# ...
php:
# ...
environment:
# ...
OIDC_UPSTREAM: ${OIDC_UPSTREAM:-keycloak:8080}
keycloak:
image: bitnami/keycloak:21-debian-11
environment:
# ...
# Must finish with a trailing slash (https://github.com/bitnami/charts/issues/10885#issuecomment-1414279144)
KEYCLOAK_HTTP_RELATIVE_PATH: /oidc/
# https://www.keycloak.org/server/hostname
KC_HOSTNAME_URL: https://${SERVER_NAME:-localhost}/oidc/Keycloak is now available at https://localhost/oidc/.
Note: the KC_HOSTNAME_URL environment variable allows you to define the public URL of Keycloak regardless of the domain name on which it is called. For example, any call to the Keycloak container via the internal Docker Compose network (for example: http://keycloak:8080/oidc/) will always return https://localhost/oidc/ URLs.
An OIDC server allows you to partition the configuration by realm, in other words, definitions and identification of clients who can discuss with it, and request authentication. Keycloak offers one by default called master. In order to respect the state of the art and improve security, we will create a realm dedicated to our project in which we can create our different clients.
Create and configure a realm
From the Keycloak interface (https://localhost/oidc/), access the administration console and connect using the credentials defined in the Docker Compose configuration (KEYCLOAK_ADMIN_USER, KEYCLOAK_ADMIN_PASSWORD).
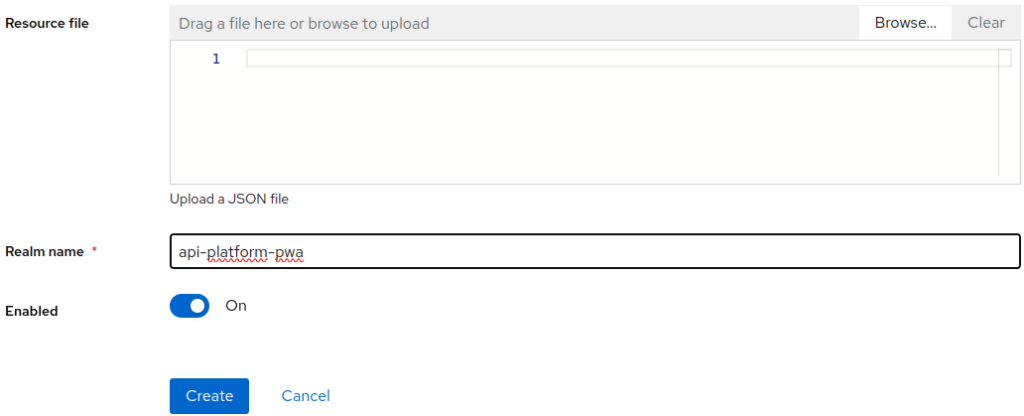
Then, in the top left menu, create a realm and name it demo:
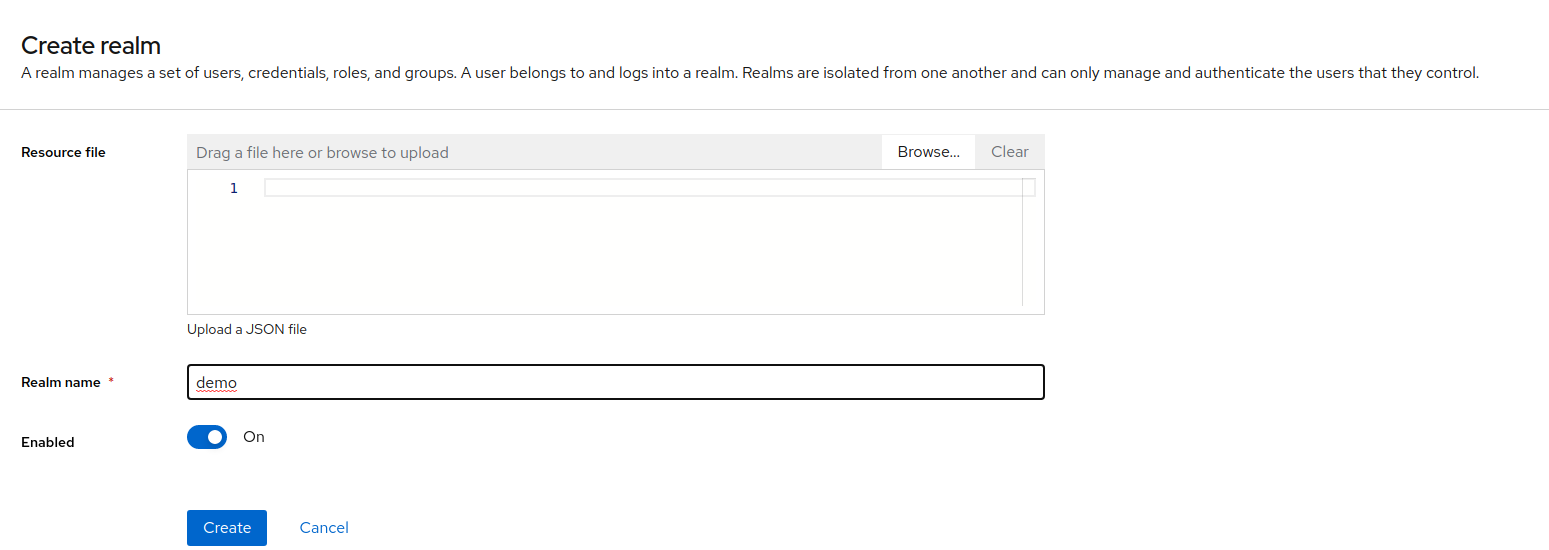
Our realm is now ready, do not hesitate to take a look at its configuration to discover everything that Keycloak offers and activates by default, and create a theme that fits your app look and feel.
Configure API Platform with OIDC
Which authorization flow should we choose for our project?
The OAuth protocol offers several authorization flows, ranging from user authorization to application authorization and other flows. In the case of a PWA (the consumer) consuming an API (the provider), we need a flow allowing the user to authenticate with Keycloak (the authorization server) and give authorization for it. exploitation of its data: this is the Authorization Code Flow.
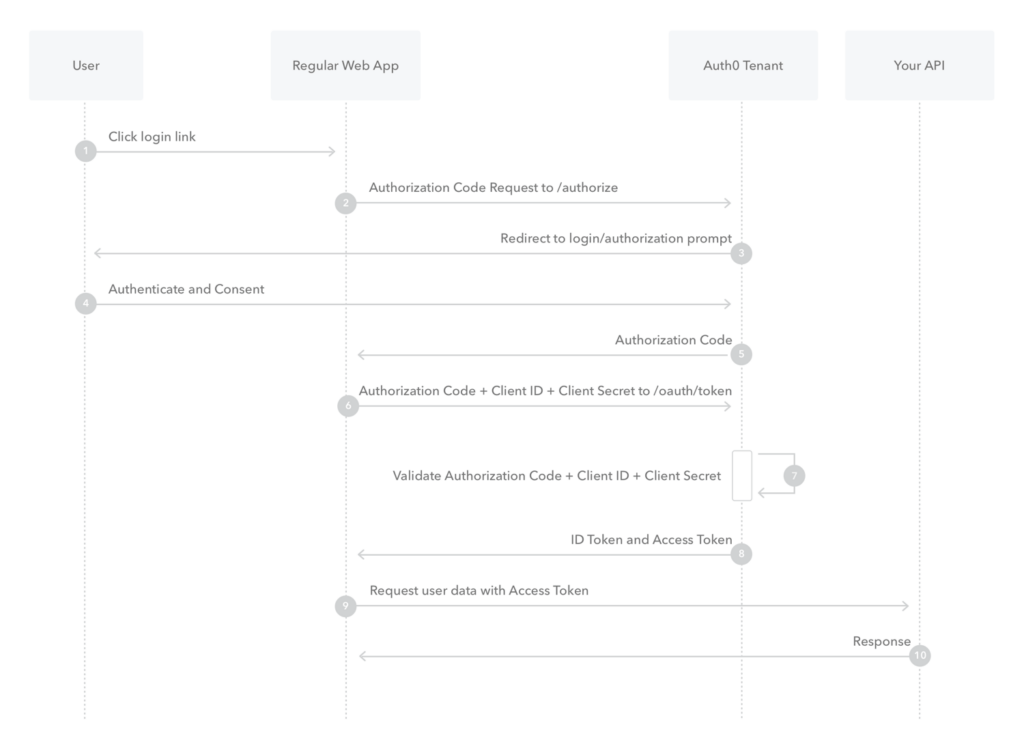
(source: https://auth0.com/docs/get-started/authentication-and-authorization-flow/authorization-code-flow)
Note: we often hear about the Implicit flow, it is deprecated for security reasons.
There are several ways to implement the Authorization Code flow in API Platform. For example, it is possible to implement a proxy such as Caddy Security or OAuth2 Proxy, or an API Gateway such as Kong, Gravitee.io or 3scale.
For our purposes, we will instead use a solution offered by Symfony and therefore integrated into our API Platform project. There are several bundles: knpuniversity/oauth2-client-bundle, league/oauth2-client, hwi/oauth-bundle, etc. However, these do not offer an API-oriented authorization layer. Fortunately, Symfony offers a mechanism adapted to our needs thanks to Florent MORSELLI and Vincent CHALAMON : https://github.com/symfony/symfony/pull/46428, https://github.com/symfony/symfony/pull/48272.
Secure the API
By default, Symfony offers two strategies: send the token to the OIDC server for validation, or decode it and validate it by the API.
If the token is sent to the authorization server, the latter will validate it and verify that it has not been manually invalidated by an administrator. This strategy is the most secure, however it requires a call to the authorization server for each HTTP request, which degrades performance:
# api/config/packages/security.yaml
security:
  firewalls:
    main:
      access_token:
        token_handler:
          # OIDC_SERVER_URL_INTERNAL: https://caddy/oidc/realms/demo
          oidc_user_info: '%env(OIDC_SERVER_URL_INTERNAL)%/protocol/openid-connect/userinfo'
It is possible to decode and validate the token by the provider without calling the authorization server. This strategy offers better performance because it avoids a call to the authorization server for each HTTP request. However, it is also less secure in the specific case where the token is manually invalidated by an administrator of the authorization server: the token will always be considered valid until it expires:
# api/config/packages/security.yaml
security:
    firewalls:
        main:
            pattern: ^/
            access_token:
                token_handler:
                    oidc:
                        # Algorithm used to sign the JWS
                        algorithm: 'ES256'
                        # A JSON-encoded JWK
                        key: '{"kty":"...","k":"..."}'
Note: the OIDC specification as well as Google recommend decoding and validating the token with the provider: https://openid.net/specs/openid-connect-core-1_0.html#IDTokenValidation, https://developers.google.com/identity/openid-connect/openid-connect?hl=fr#validatinganidtoken.
With the API now configured, we will be able to create the PWA client with Keycloak in order to authenticate its calls.
Secure the PWA
A PWA cannot be considered a trusted client because the code is executed on the user’s browser, a potentially vulnerable area. It is therefore strongly discouraged storing a secret there (clientSecret). Swagger also indicates this in its documentation:
(source: https://swagger.io/docs/open-source-tools/swagger-ui/usage/oauth2/)
For security reasons, you must use a PKCE (pronounced “pixy”: Proof Key for Code Exchange). This is a pair of verification keys exchanged at multiple times between the PWA and Keycloak, in addition to the standard flow. Moreover, the SOLID project mentioned earlier will require a tripartite key to strengthen security. This key is the hotspot of these flows. On the other hand, as the PWA can no longer provide a clientSecret, it can no longer be identified with certainty by Keycloak: the client is therefore of public type.
Note: PKCE was originally implemented to strengthen the Authorization Code flow on public clients. Its use increases security against CSRF attacks, so it is recommended to implement it even in a confidential client.
Back on the administration interface of our demo realm in Keycloak, click on the Clients entry in the side menu, then Create client in order to create and configure the client. Enter a Client ID without spaces or accents. It will be entered then in our PWA:
Enter one or more values in Valid redirect URIs to indicate which URIs are authorized during redirects performed by the Authorization Code flow. These URIs allow Keycloak to control which client makes an authentication request.
To configure the PWA, we will use NextAuth.js. This Open Source library offers multiple preconfigured connectors for different OIDC servers, including Keycloak.
After installing NextAuth.js, create the following file:
// pwa/pages/api/auth/[...nextauth].tsx
import NextAuth from "next-auth"
import KeycloakProvider from "next-auth/providers/keycloak"

export const authOptions = {
  // Configure one or more authentication providers
  providers: [
    KeycloakProvider({
      id: 'keycloak',
      clientId: process.env.OIDC_CLIENT_ID,
      issuer: process.env.OIDC_SERVER_URL,
      authorization: {
        // https://authjs.dev/guides/basics/refresh-token-rotation#jwt-strategy
        params: {
          access_type: "offline",
          prompt: "consent",
        },
      },
      // https://github.com/nextauthjs/next-auth/issues/685#issuecomment-785212676
      protection: "pkce",
      // https://github.com/nextauthjs/next-auth/issues/4707
      clientSecret: null,
      client: {
        token_endpoint_auth_method: "none"
      },
    }),
  ],
}

export default NextAuth(authOptions)
Then, add the SessionProvider to the application:
// pwa/pages/_app.tsx
import { SessionProvider } from "next-auth/react"

export default function App({
  Component,
  pageProps: { session, ...pageProps },
}) {
  return (
    <SessionProvider session={session}>
      <Component {...pageProps} />
    </SessionProvider>
  )
}
NextAuth.js offers simple integration of OAuth and OIDC protocols, but requires additional code for token refresh (see https://next-auth.js.org/tutorials/refresh-token-rotation) :
// pwa/pages/api/auth/[...nextauth].tsx
import NextAuth, { AuthOptions, SessionOptions } from "next-auth";
import { type TokenSet } from "next-auth/core/types";
import KeycloakProvider from "next-auth/providers/keycloak";

import { OIDC_CLIENT_ID, OIDC_SERVER_URL } from "../../../config/keycloak";

interface Session extends SessionOptions {
  accessToken: string
  error?: "RefreshAccessTokenError"
}

interface JWT {
  accessToken: string
  expiresAt: number
  refreshToken: string
  error?: "RefreshAccessTokenError"
}

interface Account {
  access_token: string
  expires_in: number
  refresh_token: string
}

export const authOptions: AuthOptions = {
  callbacks: {
    async jwt({ token, account }: { token: JWT, account: Account }): Promise<JWT> {
      if (account) {
        // Save the access token and refresh token in the JWT on the initial login
        return {
          accessToken: account.access_token,
          expiresAt: Math.floor(Date.now() / 1000 + account.expires_in),
          refreshToken: account.refresh_token,
        };
      } else if (Date.now() < token.expiresAt * 1000) {
        // If the access token has not expired yet, return it
        return token;
      } else {
        // If the access token has expired, try to refresh it
        try {
          // todo use .well-known
          const response = await fetch(`${OIDC_SERVER_URL}/protocol/openid-connect/token`, {
            headers: { "Content-Type": "application/x-www-form-urlencoded" },
            body: new URLSearchParams({
              client_id: OIDC_CLIENT_ID,
              grant_type: "refresh_token",
              refresh_token: token.refreshToken,
            }),
            method: "POST",
          });

          const tokens: TokenSet = await response.json();

          if (!response.ok) throw tokens;

          return {
            ...token, // Keep the previous token properties
            accessToken: tokens.access_token,
            expiresAt: Math.floor(Date.now() / 1000 + tokens.expires_at),
            // Fall back to old refresh token, but note that
            // many providers may only allow using a refresh token once.
            refreshToken: tokens.refresh_token ?? token.refreshToken,
          };
        } catch (error) {
          console.error("Error refreshing access token", error);
          // The error property will be used client-side to handle the refresh token error
          return {
            ...token,
            error: "RefreshAccessTokenError" as const
          };
        }
      }
    },
    async session({ session, token }: { session: Session, token: JWT }): Promise<Session> {
      // Save the access token in the Session for API calls
      if (token) {
        session.accessToken = token.accessToken;
        session.error = token.error;
      }

      return session;
    }
  },
  providers: [
    KeycloakProvider({
      id: 'keycloak',
      clientId: OIDC_CLIENT_ID,
      issuer: OIDC_SERVER_URL,
      authorization: {
        // https://authjs.dev/guides/basics/refresh-token-rotation#jwt-strategy
        params: {
          access_type: "offline",
          prompt: "consent",
        },
      },
      // https://github.com/nextauthjs/next-auth/issues/685#issuecomment-785212676
      protection: "pkce",
      // https://github.com/nextauthjs/next-auth/issues/4707
      clientSecret: null,
      client: {
        token_endpoint_auth_method: "none"
      },
    }),
  ],
};

export default NextAuth(authOptions);
Finally, NextAuth.js offers a React useSession Hook to verify a user’s authentication: https://next-auth.js.org/getting-started/example#frontend—add-react-hook. More generally, it is possible to secure all or part of the PWA using Next.js Middleware + NextAuth.js: https://next-auth.js.org/tutorials/securing-pages-and-api -roads.
API, PWA… Our entire project seems secure with OIDC. Really ? What about API documentation?
Secure our API documentation
By default, API Platform offers two interfaces for our OpenAPI documentation: Swagger UI and Redoc. The latter only offers query testing functionality from the browser, only in its SAAS version. So we will choose Swagger UI for our demonstration.
Swagger UI must be considered as a client in its own right, just like the PWA. Swagger UI also offers OAuth support by configuring the necessary options.
Create the api-platform-swagger client in Keycloak the same way the api-platform-pwa client was previously created.
API Platform has an option to configure Swagger UI:
# api/.env
OIDC_SERVER_URL=https://localhost/oidc/realms/demo
OIDC_SWAGGER_CLIENT_ID=api-platform-swagger
# api/config/packages/api_platform.yaml
api_platform:
# …
oauth:
enabled: true
clientId: '%env(OIDC_SWAGGER_CLIENT_ID)%'
pkce: true
type: oauth2
flow: authorizationCode
tokenUrl: '%env(OIDC_SERVER_URL)%protocol/openid-connect/token'
authorizationUrl: '%env(OIDC_SERVER_URL)%protocol/openid-connect/auth'API, PWA…and now Swagger UI. Congratulations ! Our API Platform project is fully secure with OIDC!
In bierf
Application security is not a subject to take lightly! But thanks to OIDC and its integration into API Platform, the project opens up to excellent security and users maintain control over their permission.
However, the access controls presented previously are managed in a fairly generic way: a user has access to this or that part of the application. This does not yet make it possible to define whether the user has access to a particular object, for example.
There are more granular Open Source and SaaS authorization solutions, for example Casbin or Permit.io. Auth0 is currently working on a more granular access control system, in addition to its OIDC: Fine Grained Authorization.
Permission models are a topic of study in their own right, perhaps the subject of another article.
Find this architecture on the GitHub repository of the API Platform demo.
Go further
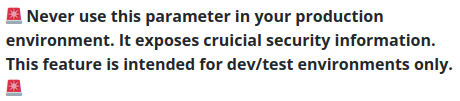
Create an OIDC realm from a JSON configuration
Keycloak provides a service to load a JSON configuration to create a domain containing clients, users, etc. : Keycloak Config CLI.
Its implementation is very easy with Docker Compose:
# docker-compose.yml
version: "3.8"

services:
  # ...

  keycloak-config-cli:
    image: bitnami/keycloak-config-cli:5-debian-11
    environment:
      KEYCLOAK_URL: http://caddy/oidc/
      KEYCLOAK_USER: ${KEYCLOAK_USER:-admin}
      KEYCLOAK_PASSWORD: ${KEYCLOAK_PASSWORD:-!ChangeMe!}
      KEYCLOAK_AVAILABILITYCHECK_ENABLED: true
      KEYCLOAK_AVAILABILITYCHECK_TIMEOUT: 120s
      IMPORT_FILES_LOCATIONS: '/config/*'
    depends_on:
      - keycloak
    volumes:
      - ./keycloak-config:/config
// keycloak-config/realm-demo.json
{
"realm": "demo",
"displayName": "API Platform - Demo",
"enabled": true,
"registrationAllowed": false,
"users": [
{
"username": "admin",
"enabled": true,
"emailVerified": true,
"firstName": "Chuck",
"lastName": "NORRIS",
"email": "admin@example.com",
"credentials": [
{
"type": "password",
"value": "Pa55w0rd"
}
]
}
],
"clients": [
{
"clientId": "api-platform-swagger",
"enabled": true,
"redirectUris": ["*"],
"webOrigins": ["*"],
"publicClient": true
},
{
"clientId": "api-platform-pwa",
"enabled": true,
"redirectUris": ["*"],
"webOrigins": ["*"],
"publicClient": true
}
]
}React-Admin and Keycloak
Is your PWA a React-Admin application? Take a look at the ra-keycloak plugin.
Be careful, however: if your PWA integrates both a front and a React-Admin part (as is the case with the API Platform demo), it is not possible to combine ra-keycloak with NextAuth.js. In which case, it is best to only use NextAuth.js.
Next.js Middleware + NextAuth.js with a single provider
By default, NextAuth.js offers an intermediate page leaving the choice to the user of the authorization server. But if the PWA only calls one (for example, the company’s authorization server), this page may be useless. To avoid this intermediate page, it is recommended to name your provider when implementing NextAuth.js (for example: “id: ‘keycloak’”) and specify this name when calling the signIn method: “signIn( ‘keycloak’)”.
https://next-auth.js.org/getting-started/client#starts-oauth-sign-in-flow-when-clicked
If you want to secure all or part of a PWA, the Next.js Middleware + NextAuth.js combination seems more suitable. However, this approach does not allow specifying a particular provider. When logging in, the user then lands on the intermediate page.
https://github.com/nextauthjs/next-auth/discussions/7488
Why configure only one OAuth client for the PWA?
As part of the API Platform demo, the PWA contains both a public front and a private administration. The administration represents only one part of the PWA. It is the PWA which is the OAuth client, only one OAuth client is enough.
Only the administration is private, so it is easy to secure this PWA using NextAuth.js.
However, if frontend and admin were separate applications, then two separate OAuth clients would need to be created.
Which algorithm to choose for signing the token?
Symmetric vs asymmetric algorithms, key size, deprecated algorithms for security reasons… How to choose the right token signature algorithm?
This article presents several useful information for these questions: https://www.linkedin.com/advice/0/how-do-you-choose-right-jwt-signing-algorithm.